Page Content
- Community App Flyer
- Create Parent Portal
- Adding Students to Portal
- Online Registration, Re-Enrollment
- School Registration Fees
- Fee Waiver Instructions
- Forgot Password
- McKinney-Vento Instructions
- Tribal Affiliation Instructions
- Parent Quick Guide to Purchase and Pay
- Setting Up an Observer Role in Canvas
School Registration Opens August 1st & Moving to Focus School Software
Granite School District is excited to announce that a new student information system, Focus School Software, is launching soon.
Payments will no longer be made through a separate webstore, but easily accessible from the Parent Portal.
The old webstore will be taken down beginning July 18, 2023 at 5 p.m.
Focus will be available for payments when registration begins on August 1, 2023.
Payments can be made with your school’s financial secretary during the interim.
Thank you for your patience while we implement this new, more convenient service.
Granite School District Parents,
In this packet you will find a number of resources that are designed to help you make the
most of the district’s new School Information System. If you have any questions, please
don’t hesitate to contact your student’s school for assistance.
Community App Flyer
Focus School Software
Community Mobile App


Focus is simply the BEST student and business solution for K-12+
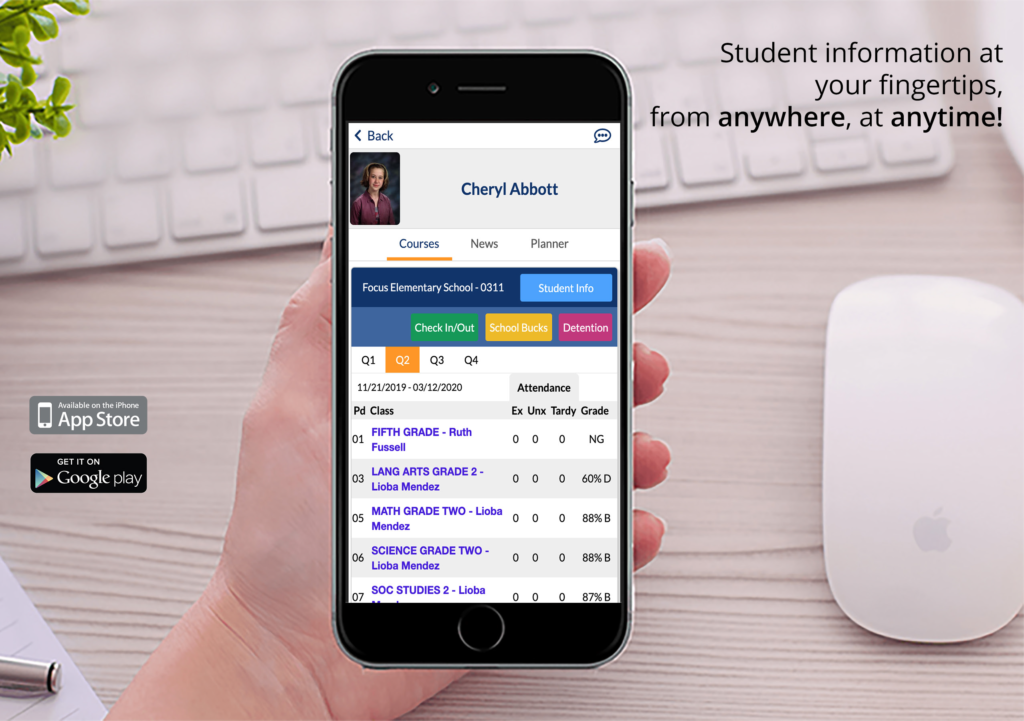
Focus School Software is pleased to offer the Granite Schools Community App. The App, which is available from both the Google Play and Apple App stores, provides administrators, teachers, students, and parents a streamlined way to access student information.
Parents today want simple and easy access to their child’s grades, schedule, attendance, and school information. The Granite Schools Community App is an easy to use mobile app allowing parents and students to view their student information.
The Mobile App gives Parents, Students, Teachers, and Community Members the benefits of:
- Real-time grades
- Teacher, school, and district announcements
- Teacher & district resources
- Teacher communication
The Community App also allows districts to quickly convey school information, such as school closings in the event of an emergency, reminders about school events, and help to reach out to parents that can’t always make it to campus.
In addition to students and parents, the Granite Schools Community App provides administrators and teachers with the ability to take attendance, view student information, and more.
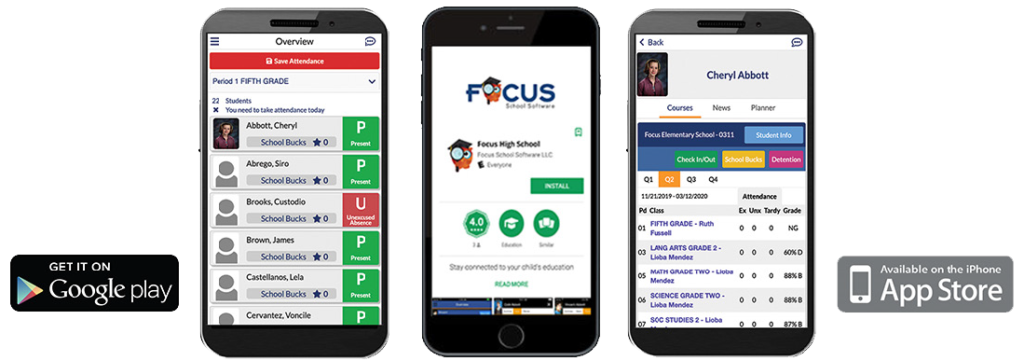
From grades and attendance, to school events and social media, the Community App allows users to gain instant access to the information they want, when and where they want it.
Create Parent Portal
Parent Portal
NOTE: If you already have a Parent Portal
account, you do not need to create a new one.

Creating Focus Parent Portal Account:
Step 1: Go to Focus.graniteschools.org
Step 2: Click on the button that reads “Click here to register for a new account.”

Step 3: Complete all the required fields to create your Focus Parent Portal
account.
*All fields are required:
- Enter your first and last name
- Enter your email
- Create a username you will remember
- Create a seven character or longer
password.
o Passwords must contain ALL
four of the characteristics
below:- One upper case letter
- One lowercase letter
- A number
- A special character
- Click the Create Account button
- Once you have created your account
successfully, you will receive an activation email

Step 4: Go to your email and click on the link to activate your account

Step 5: Once you have activated your Focus Parent Portal account, it can take up to 20 minutes for the account to become fully active.

FAQ
What if I click the create account button and it takes me to a blank page?
Your account will need to manually activated. Contact the school and they can activate it for you.
What if I don’t receive my email?
Your account will need to manually activated. Contact the school and they can activate it for you.
Adding Students to Portal
How to Add a Student to an Existing Focus Parent Portal Account:
Step 1: Go to Focus.graniteschools.org

Step 2: Click on the button that reads “Click here to add a student to your existing account.”

Step 3: Enter your username and password to log into the Focus Parent Portal.
Click Login.
*If you already had a portal, your username and password and password are the same. If you do not have an account, go back to focus.graniteschools.org and click “Click here to register for a new account”.

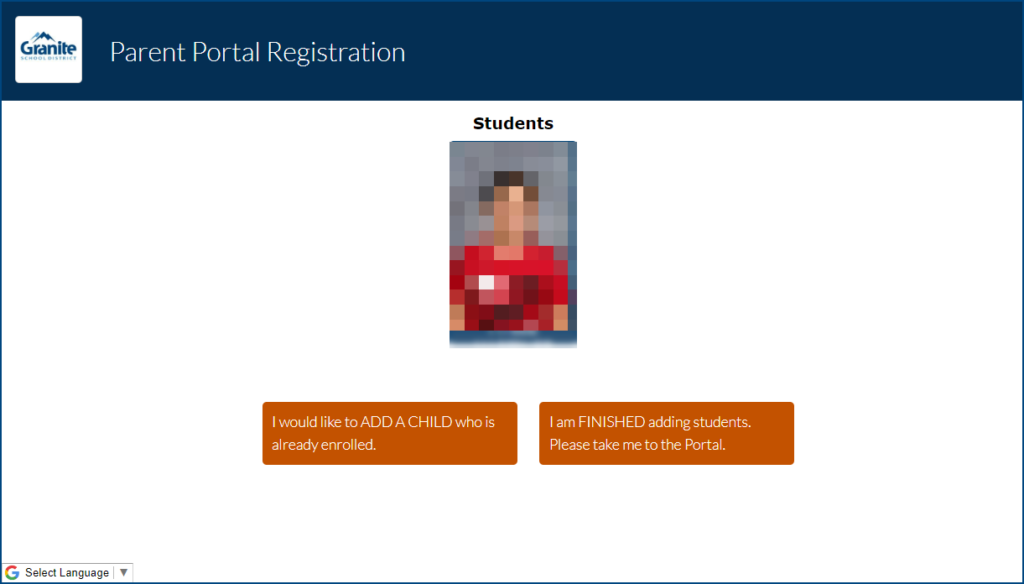
Step 4: Click the “I would like to ADD A CHILD who is already enrolled” button.

Step 5: Add the Student ID and Student’s Birthdate, check the I’m not a robot
reCAPTCHA, then click the Add Student button.

Step 6: Add your First and Last Name as it appears in the student’s account. Check the I’m not a robot reCAPTCHA and click the Add Student button.
*You must be listed as a legal guardian in the student’s account to link your student.

Step 7: Your student is now added to your Focus Parent Portal. If you have additional students, repeat steps 3-5. If you are finished adding students, click the “I am FINISHED adding students. Please take me to the Portal.” button.
Online Registration, Re-Enrollment
Online Registration Help
NOTE: Parents must have a Portal Account to access online registration. Student/Employee Portal Accounts CANNOT be used for online registration.
Go to focus.graniteschools.org to access online registration.

- Type your username and password into the available fields,
- Click “Log In” to access your account.
Re-Enrollment:
Step 1: Click on the GREEN button to begin your Re-Enrollment Form (also known as Online Registration).
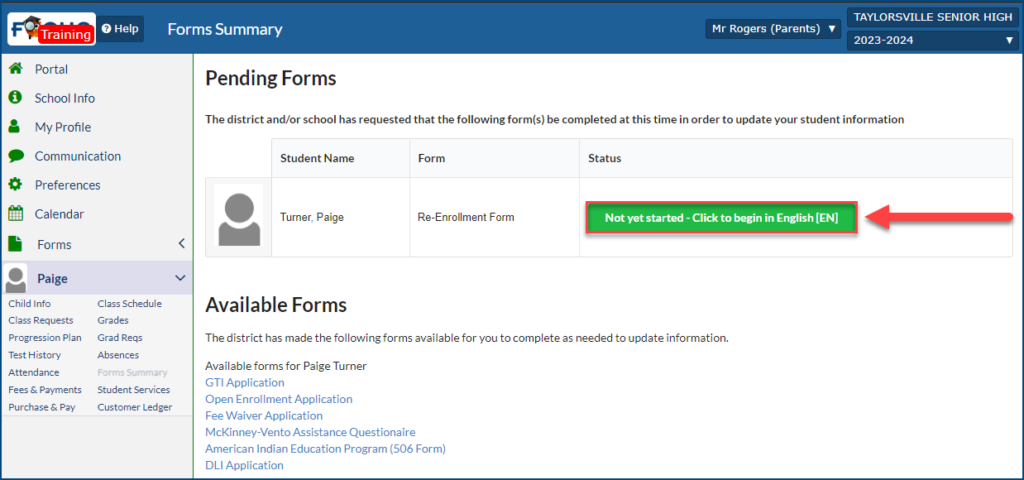
*If you do not see the Pending Forms immediately, click on the dropdown for the student in the left menu, then click Forms Summary. If you have multiple students at different schools, you will need to click on each student’s name and Forms summary to complete the re-enrollment process.


Step 2: Verify student information is correct. If you have any changes for the
primary address or phone number, you can access the Address & Phone Update
Request form from the Forms Summary page on your portal. If everything is
correct, click Next Page.


Step 3: Verify contact information for your student. If everything is correct, click Next Page.


Step 4: Complete the Race/Ethnicity Questions. You are required to choose fields A and B. If your student has multiple races, use the multiselect field in Field C. If your student has a tribal affiliation, check the box in field D and complete all fields that populate. Additional instructions for the 506 form. Once complete, click Next Page.

Step 5: Complete the General Information page. Home Language fields will default to English. Please make sure to select which language adults in your home most frequently use when speaking to your student. Click Next Page to continue.


Step 6: Add optional verification. If your student has an updated birth certificate, immunization card, or you have a new ID, you can now upload those documents into your re-enrollment process. If you do not have any new information, you can click Next Page to continue.

Directions for the Optional Verification Document Upload:
A. Select the document type from the dropdown

B. Click the red SAVE button

C. Hover over the column that says “NO FILES” and select your upload option

D. Upload, scan, or take a picture of the document

Step 7: Review all the required District Policies by clicking on the links. To confirm that you have read the policies, check the box to the right of the policy name. You can also view additional informational links below, then click Next Page to continue.
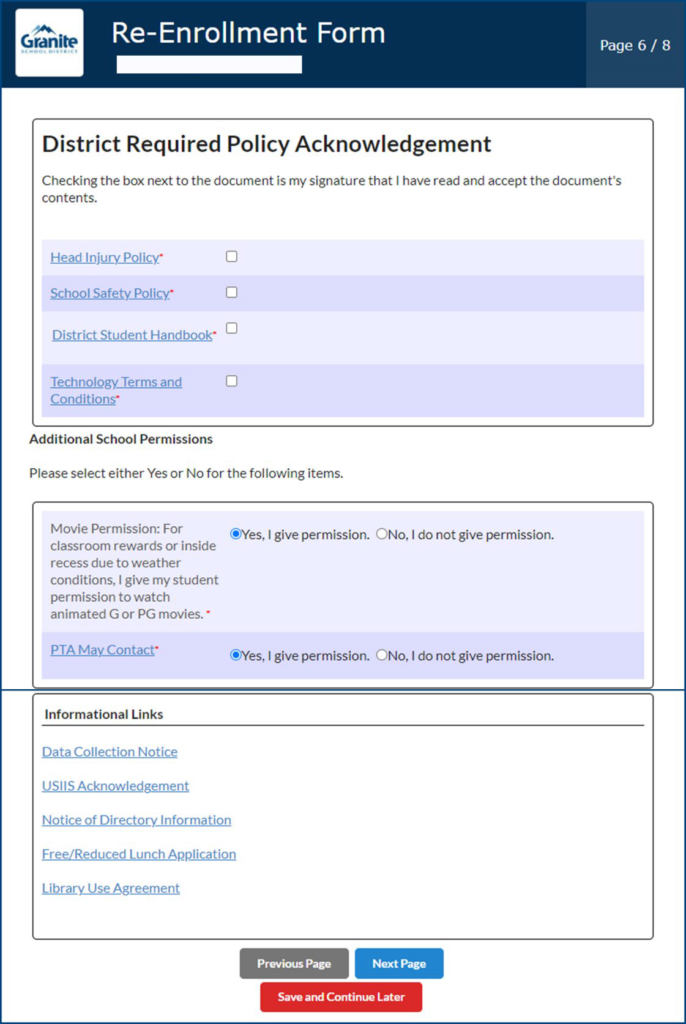
Step 8: If you would like to apply for a fee waiver, please check the box on page seven and complete the information that opens below. More information.

Directions for the Fee Waiver Document Upload:
A. Select the school year and document type from the dropdown

B. Click the red SAVE button

C. Hover over the column that says “NO FILES” and select your upload option

D. Upload, scan, or take a picture of the document

Step 9: If you would like to apply for McKinney-Vento assistance check the box. If
you do not want to apply, click submit and finish. Additional information.

Your district re-enrollment is complete! Check your Forms Summary page to see if you have any school specific forms. For example, school handbook or policies, GTI Travel Form, etc.
If you have school fees, follow this link for additional instructions.
To view your completed forms, click on your student’s drop down on the left hand side, select Forms Summary.
You can view your completed forms at the bottom of the page. This also allows you to see if the school has accepted, denied, or if your changes are still pending.


School Registration Fees
School Fees
Once you have completed the Re-Enrollment form and any other required school forms, your Focus Parent Portal will now display the dashboard.
Go to focus.graniteschools.org to access online registration.
- Type your username and password into the
available fields, - Click “Log In” to access your account.

Under the District & School Announcements tile, you will see an alert for outstanding invoices.

Step 1: Click on the alert “You have available invoices! Please review them here.”
Step 2: Click “View Now” button at the top of the screen.

Step 3: All invoices for this student will display on the screen. To view more information about the invoice, click “More Details” button.

Here is an example of an invoice for a basic fee for Cyprus High School. To return to the previous screen, click the close button.

Step 4: Check the box by the invoice you would like to pay. If you have multiple invoices to pay, you can check all the boxes available.

Step 5: Complete the Pay by Credit Card secure payment form.
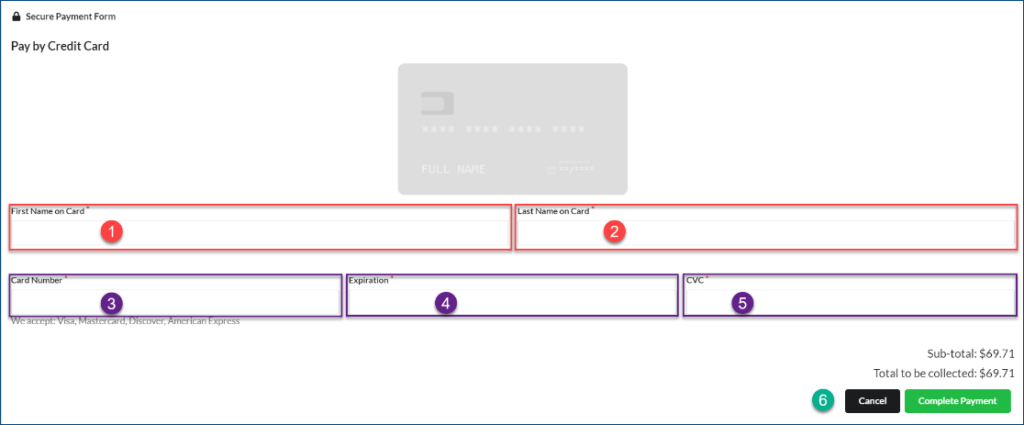
- First Name on Card
- Last Name on Card
- Card Number
- Expiration Date
- CVC
- Click “Complete Payment” to finalize your payment
*Click Cancel if you would like to cancel your transaction
Step 6: Once you have completed your payment. You will receive a payment confirmation email.
After you have completed your re-enrollment and all school fees have been paid, the student schedule will be released.
Before Completion

After Completion

Fee Waiver Instructions
Fee Waiver Instructions:
Step 1: Check the Apply for Fee Waiver box.

Step 2: Verify student information and review qualifications.
*A Fee Waiver application must be completed for EACH student in a family.

Step 3: Select the reason for qualifying to apply for a fee waiver, supporting documentation is REQUIRED.

If you selected option six as a qualifying reason to apply for fee waiver, more information will appear below.
Please review the definitions of household income and follow the steps below to list all income on a monthly basis, before deductions.
A. Complete the Household Income

a. Enter Last Name
b. Enter First Name
c. Enter Monthly Income
d. Enter Pensions/Retirement/Social
Security Income
e. Enter any other income
f. Total the Monthly Income for this earner
Hit ENTER on your keyboard to add additional lines.
Repeat the process until you have added all members of your household.
B. Click the red SAVE button. If you do not click save, your changes will not be kept.


C. Enter the total number of household members.
D. Enter the total monthly income from all sources.


Step 4: Upload documents based on which reason you selected above.
A. Select the school year and document type from the dropdown

*If none of the qualifying reasons apply, but you would still like to apply for a fee waiver due to other
extenuating circumstances, please state the reason in the open text field.
B. Click the red SAVE button

C. Hover over the column that says “NO FILES” and select your upload option

D. Upload, scan, or take a picture of the document

Step 5: The waiver application date will auto populate with today’s date. Click Next Page on the re-enrollment application to continue.
Forgot Password
Parent Portal Forgot Password
Step 1: Go to Focus.graniteschools.org
Step 2: Click on the button that reads “Click here if you forgot your login”.

Step 3: Enter your email address that is linked to your student’s account. Click Continue.

Step 4: Select your email address from the dropdown and complete the captcha and click Continue.
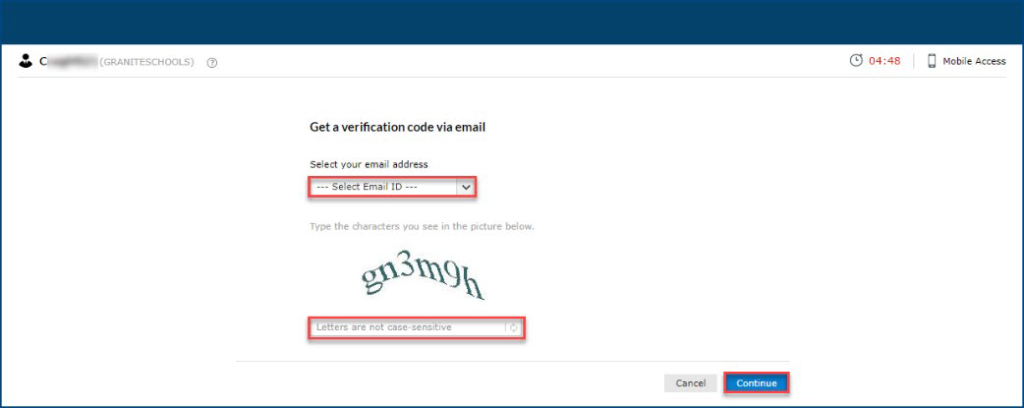
Step 5: A verification code will be sent to your email. Enter the code into the box on this screen, complete the captcha and click continue.

Step 6: Choose a new password.
Passwords must have the following:
- Must have a lowercase letter
- Must have an uppercase letter
- Must have a number
- Must have a special character
- Must be at least seven characters long

Step 7: Your password has been reset. You can go back to Focus.graniteschools.org to login to your Focus Parent Portal Account.

McKinney-Vento Instructions
McKinney Vento Instructions:
Step 1: Check the Apply for McKinney Vento box on the re-enrollment application.


Step 2: Review the checkboxes below and select all that apply to your student:

Step 3: If you selected any of the checkboxes above, please list all school-aged siblings of the student.

- Enter the First and Last Name of the sibling
- Add the Student ID of the sibling
- Add the School the sibling attends
- Add the grade level for the sibling

If you have more than one school-aged siblings to add, hit ENTER on your keyboard to add additional siblings. Repeat steps 1-3 until you have added all siblings.

Click the red SAVE button after you have entered all siblings.

Below is an example of how it will display once you have saved your changes:

Step 4: Check the box to certify that all information submitted is correct to the best of your knowledge.

Step 5: Click Submit and Finish to complete the re-enrollment process.
If you have any questions concerning the McKinney Vento Questionnaire or a homeless situation, contact the McKinney-Vento Liaison, Holly Chappell, at 385-646-4678.
Tribal Affiliation Instructions
Tribal Affiliation:
If your student has a tribal affiliation, check the box on page three of the re-enrollment process.

- Select the Tribal Affiliation from the dropdown. If you do not see your Tribal Affiliation, choose other.
- Enter your student’s CIB number.
Complete the 506 Form: - Select who has Tribal Membership
- Type the name of the Person with Tribal Membership
- Add Tribe or Band Name
- Enter Tribe Address
- Enter Tribe City
- Enter Tribe State
- Enter Tribe Zip Cord
- Add Tribe or Band Membership Number
- Add Other Evidence establishing Tribe Membership. Follow the steps below to upload.
a. Type description of evidence establishing membership in the Description box.
b. Click the red SAVE button
c. Hover over the column that says “NO FILES” and select your upload option.
d. Upload, scan, or take a photo of documentation - Add Parent/Guardian Name
- Add Address
- Add City
- Add State
- Add Zip
- Add Phone Number
- Add email address
- Type your name to sign the Attestation Statement verifying that the information provided is true and correct to the best of your knowledge and belief.
- Click Next Page to continue with your re enrollment application.


Parent Quick Guide to Purchase and Pay
Parent’s Quick Guide to Purchase & Pay
Parent Portal Purchase and Pay
1. Parents and Students with outstanding invoices will receive an Alert on their Portal Screen.
Student Example:

Parent Example:
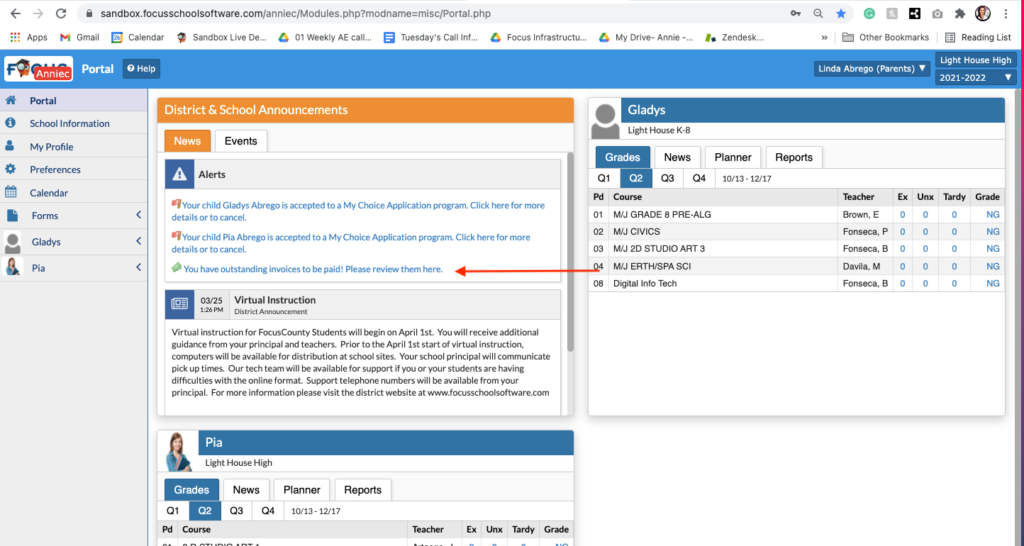
2. Select the link to continue to Purchase and Pay screen.
3. Select the checkbox for the invoices that you wish to pay and click the Continue button in the bottom right of your screen.
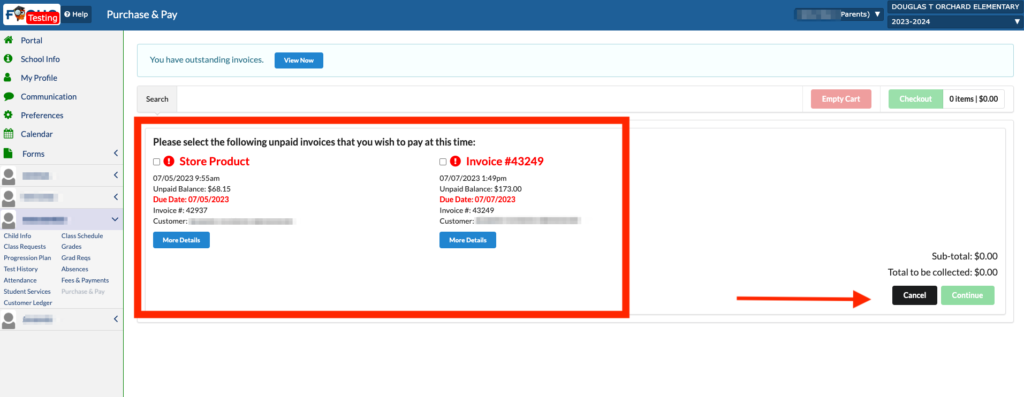
4. Fill out the appropriate information regarding your credit card information.

5. Click Continue to receive a transaction confirmation screen.

6, Click View Receipt Now to go directly to the receipt. Focus will automatically send a receipt via email.
Customer Ledger
Parents can see their students balances by clicking on the Customer Ledger menu option.
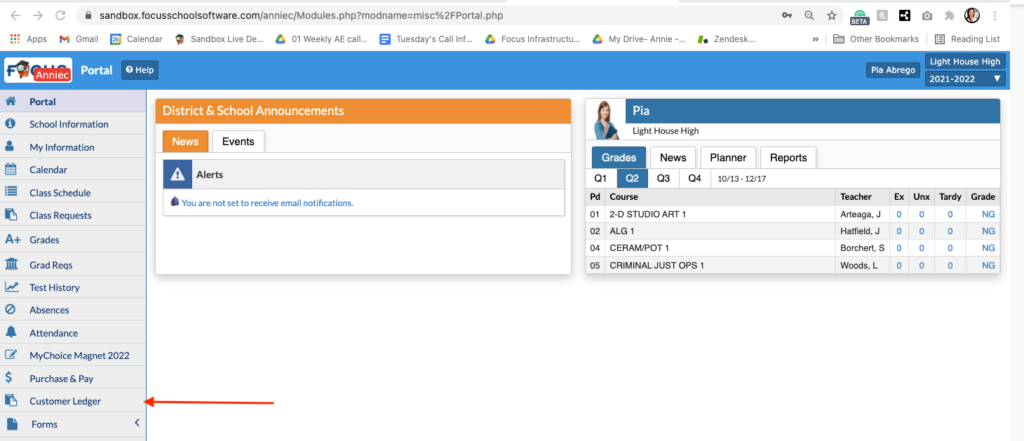
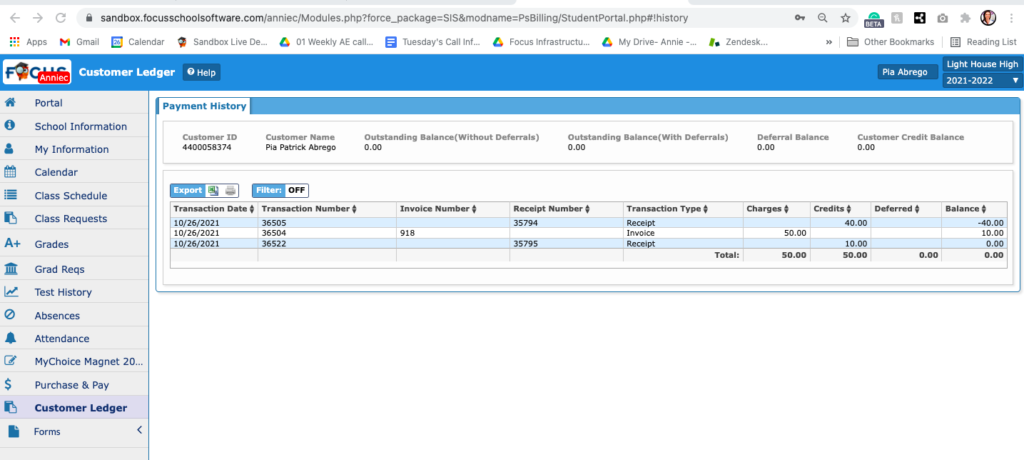
Shopping Cart
Parents will be able to access the Shopping Cart through the Parent Portal, under Purchase and Pay. The screen will display any products available at the selected child’s school. However, parents can add items to the Shopping Cart representing the entire family, by enabling all of the schools that each student attends.

1. Add items to the cart by clicking the green Add to Cart button.
2. Items in the cart will display on the right side of the screen.

3. Remove an item from the cart by clicking the red Remove from Cart button.
4. Any items marked as Donations will allow the ability to enter an amount for the donation.
- Parents can add items to the Shopping Cart for all linked students and check out just once, they are not restricted to one student at a time.

5. Click the green Checkout button in the top right corner to proceed to the Shopping Cart Summary screen.
The Shopping Cart Summary screen provides a list of Products that have been added to the Shopping Cart for purchase. If students have any Outstanding Invoices to pay, these will be listed in red at the bottom of the Shopping Cart Summary screen.
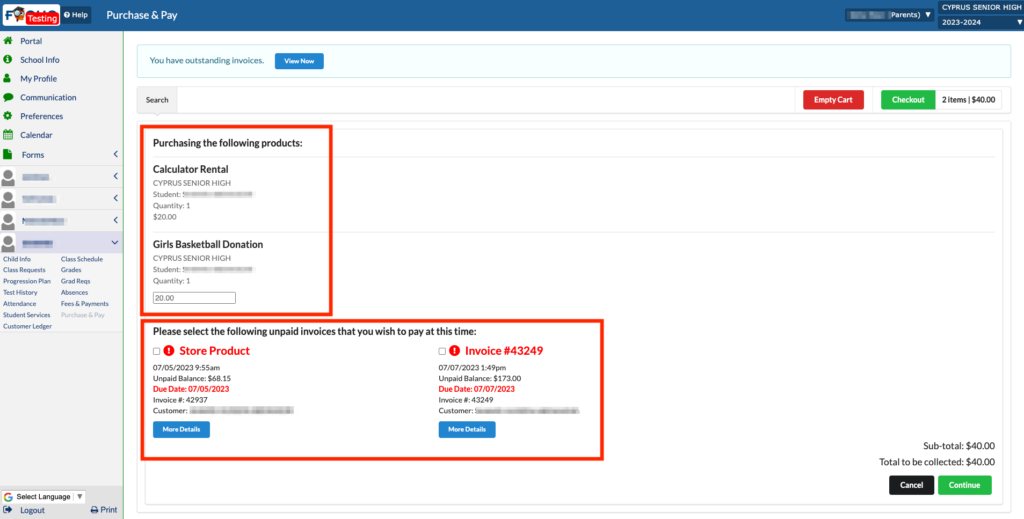
1. Select the checkbox for the invoices that you wish to pay and click the Continue button in the bottom right of your screen.
2. Fill out the appropriate information regarding your credit card information or electronic check payment.
3. Click the Complete Checkout button when finished.
4. Click View Receipt Now to go directly to the receipt. Focus will automatically send a receipt via email.


5. Click Continue to receive a transaction confirmation screen.
6. Click View Receipt Now to go directly to the receipt. Focus will automatically send a receipt via email.

Setting Up an Observer Role in Canvas
CANVAS OBSERVER PAIRING CODES

For Canvas courses this year, parents must create Canvas parent accounts and add themselves as observers using pairing codes generated by their students.
STUDENTS: HOW TO GENERATE A PAIRING CODE
In Global Navigation, click the Account link [1], then click the Settings link [2].
Click the Pair with Observer [3] button on the right side of the settings screen.
Copy the six-digit pairing code [4]. You will need to share the code with the observer who will link to your account. The pairing code will expire after seven days or after one use.
PARENTS: HOW TO CREATE AN ACCOUNT AND PAIR A STUDENT
Access the Granite instance of Canvas.
You will need to create a new Canvas account (even if you already had one). Click on Parent of a Canvas User? Click Here for an Account [5].
Fill out the information on the form including the pairing code your student generated [6] and check the CAPTCHA box [7].
Click on Start Participating [8].
If you have additional students, add their pairing codes by going to Account in Global
Navigation, then Observing, and add the additional pairing codes.


You must be logged in to post a comment.