Google Classroom is a free Google app that lets teachers create classes, distribute assignments, send feedback, and see everything in one place. It simplifies procedures for teachers sharing files with students. When teachers create assignments, it can automatically creates a copy of a specified file from Google Drive for each student within an organizational structure then allows students to “turn in” those files virtually, which changes the permissions of the file from student-owned back to teacher-owned.
This video from Technology for Teachers and Students provides a good overview for the basics of using Google classroom…
Or use the instructions below…
Access Google Classroom by going to http://classroom.google.com.
Google Classroom is only available for Google Apps for Education, so teachers and students will need to sign in with their granitesd.org credentials.
Create a Class
To create a class click on the + (1) in the top right corner. Then click on Create Class (2).
Enter the name of your class. It is advisable to use your name in the class name so students with multiple classes in Google Classroom can easily identify it. If you teach multiple groups of students, it will work best if you create a separate class in Google Classroom for each group of students. For example: if I taught multiple sections of 11th grade English, I would create a class called “Peirce English 11” and add the period for the section number.
You will see each class listed in your Google Classroom dashboard. Click on the name of the class you wish to access to enter the Google Classroom for that class. You can also easily access your different classes by clicking on the 3 lines in the top right corner to open a navigation menu.
Selecting a Theme
You can change the color scheme and look of your Google Classroom by clicking on Select Theme. There are several images available in the Gallery or or patterns you can select by clicking on Patterns. Once you have chosen a theme, click on Select class theme at the bottom. The color scheme of your classroom will change to match the image or pattern you have selected for your theme. You can also upload your own photo to use in your Google Classroom by clicking on Upload photo.
Adding Students to Your Class
To add students to your class click on People (1) along the top navigation.
The easiest way to invite students to your class is by giving students the Class code (2). The class code is also visible on the Stream page of your Classroom. Students can join your class by signing in to Google Classroom and clicking on the + sign in the top right, then Join class and enter that Class code. As the teacher, you can click on the dropdown arrow next to the class code to open a menu which will allow you display the code for students, reset the code, or disable the code.
Another way for you to invite students to your Google classroom is by clicking on the Invite Students icon (3) and entering all of their email addresses.
There are a few more settings you will want to consider for how your students can interact in your Google Classroom. These settings are accessible by clicking on the gear icon (4). One setting to consider is how much you want to allow students to communicate. You can allow students to post and comment, only comment, or only allow the teacher to post or comment. Teachers may want to consider beginning with more restricted communication methods until they feel comfortable allowing students more options.
Course Stream
The Course Stream is where you and your students will be able to see all new activity in your Classroom.To access your course stream, click on Stream (1) in the top navigation.
You can also create Announcements for your students in the Course Stream. To do this, click in the Share box (2). A new window will appear. Type your announcement (3). If you need to attach further information (3) to the announcement click on the icon for the source of the content you’re attaching. You can send the same announcement to multiple classes. To do this, click on the course selector (4) to choose which classes you would like to send this announcement to. When you are have finished creating your announcement you can post it immediately by clicking on Post (5) or schedule it to post at a certain time or save a draft of it by clicking on the dropdown arrow in the Post button.
Classwork
Classwork (1) is likely where you and your students will spend most of your time. This is the area where you posts assignments, quizzes, questions, and materials. To add an item to your classwork, click on Create (2), and then choose the type of item you would like to create from the list that pops up (3).

Classwork can be organized into Topics according to units or any other way you may want to organize your classwork. Topics can be added by clicking on Create > Topic directly from the Classwork page or when you are creating an assignment or other item in Classwork. Topics can be reordered on the Classwork page simply by clicking and dragging the topic to where you would like it. It is suggested that you have one “General Resources” topic at the top of your Classwork page with materials your students may need to access throughout the course but aren’t related to one assignment.
Assignments
The assignments feature in Google Classroom makes collecting and grading student work very easy, especially when you create and share a Google Doc or Slide as your assignment template.
- Create the assignment template in Google Docs or Slides – whatever app you would like them to use to complete and turn in as their finished product for the assignment. This could be a Google Doc or Google Slides with the title and simple instructions at the top or a more complicated worksheet or even a HyperDoc. You don’t need to worry about having a spot for students to put their name, because their names will be automatically added to the title of their submitted file if you follow this procedure.
- In the Classwork section of your Google Classroom, click on the Create button at the bottom right and choose Create Assignment.
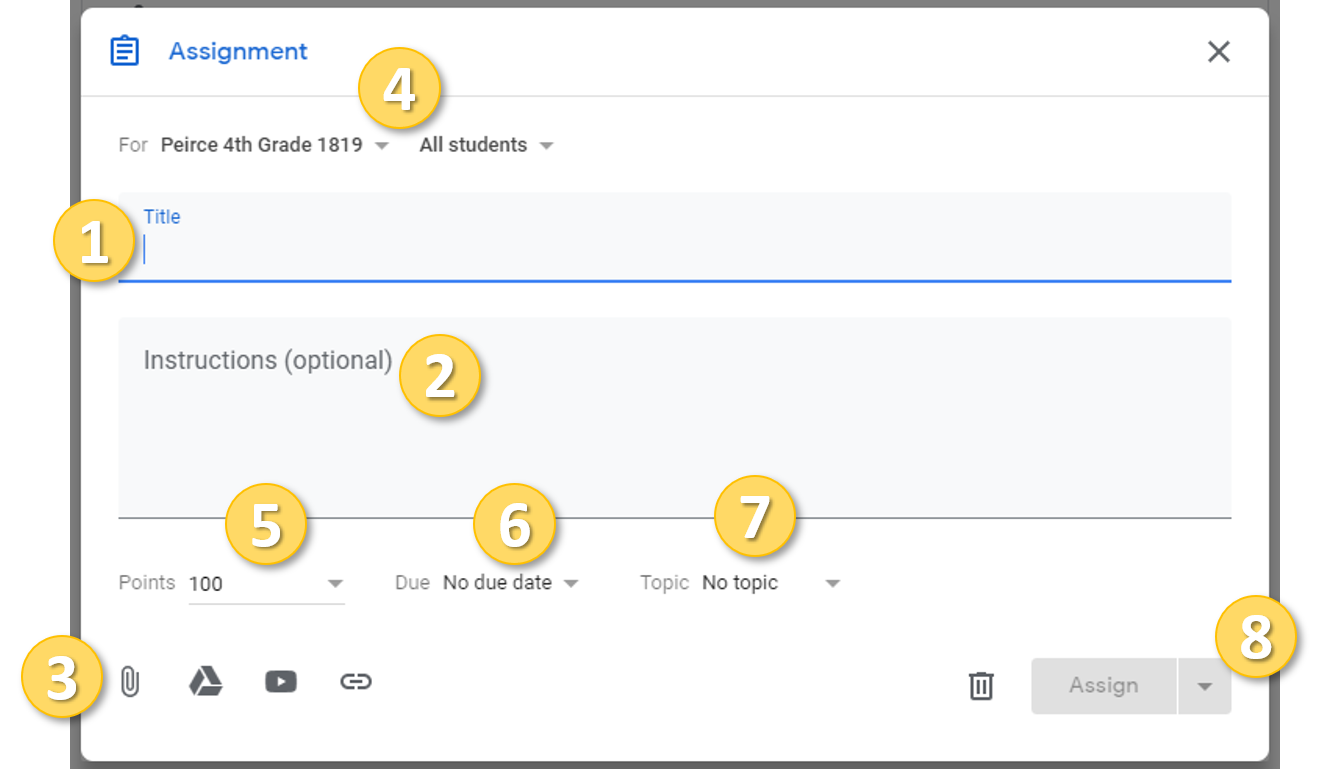
- Give your assignment a Title (1) and provide additional instructions if needed (2). Click on the Google Drive link (3) to upload the assignment template (See the next step). (You can add assignment templates or content from other sources using the links, but the Google Drive option generally works best for assignments. You can add multiple items to an assignment allowing you add the assignment template as well other instructional resources or videos to help with the assignment.) In this window, you can also choose which classes or particular students to assign the assignment to (4), the number of points (5), the due date (6), and give the assignment a topic (7) so they can be grouped together. When you have finished creating your assignment, you can click on the Assign button (8) to post the assignment immediately or click on the dropdown arrow next to it to schedule it or save a draft.

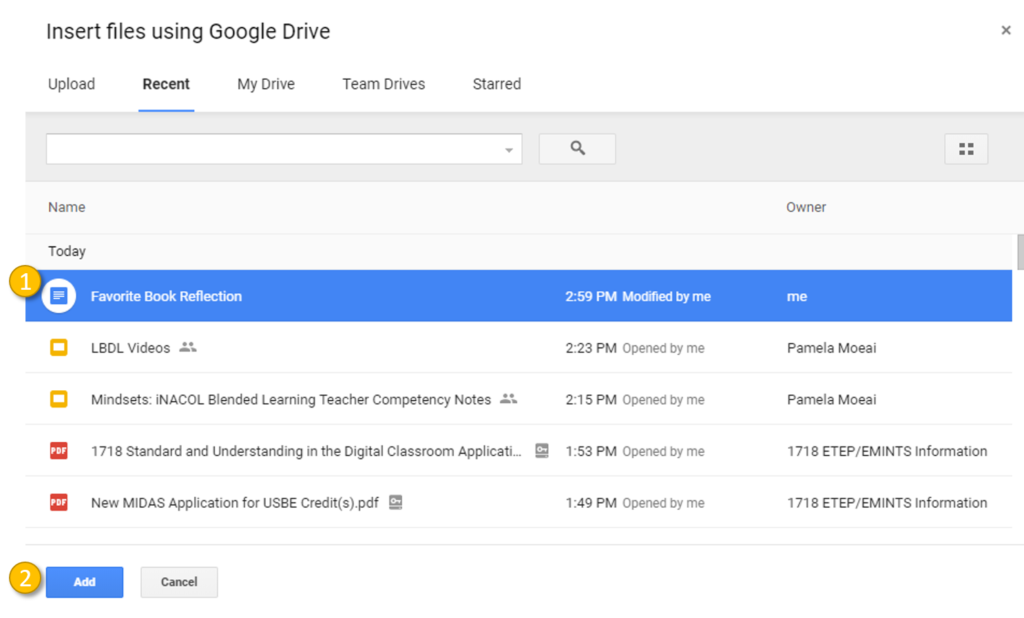
- When you click on the Google Drive button to add the assignment template you have created, a new window will appear in which you select the assignment (1), then click on Add (2).

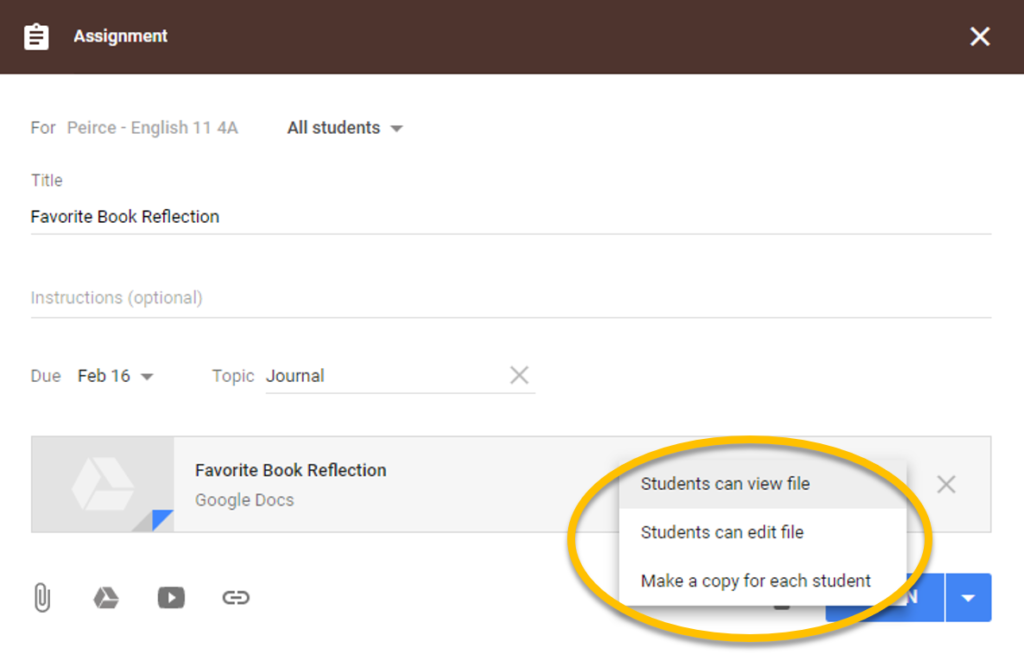
- After you have added the file from your Google Drive, you can choose what sharing settings you would like to use for the file. If you have created an assignment template in Google Drive, choose Make a copy for each student. This will create a new copy when the student clicks on the the link. The students can edit this copy and you, as the teacher, have access and edit rights to as well. It will also rename the document to include their name.

- When you click on the Google Drive button to add the assignment template you have created, a new window will appear in which you select the assignment (1), then click on Add (2).
- Students will find the assignment in their Google Classroom Stream. To access the assignment template, they click on the title of it which will open a new copy renamed to include their name for them to edit. When they have completed their assignment, they click on Turn in, to turn it in to the teacher for grading. Before a teacher has graded and returned and assignment, students are able to “unsubmit” it if they want to make changes. If using a Google app like Docs or Slides, teachers are able to view students’ assignments in the classroom as they work on them.
- Grading Student Assignments
- In your Classroom Stream, you will see how many students have and have not completed the assignment. You can access the assignment by clicking on the name of the assignment.

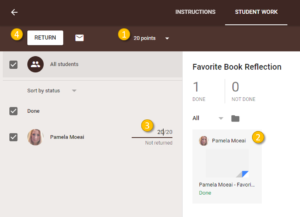
 You can change the total number of points for the assignment by clicking on the point total up at the top (1) and entering the point total for the assignment.
- You will see all of your students’ assignments as tiles. Click on the name of each student’s individual assignment (2) to open their document.
- Enter grades next to their names (3).
- When you have finished entering grades, click on Return (4).
- In your Classroom Stream, you will see how many students have and have not completed the assignment. You can access the assignment by clicking on the name of the assignment.
Questions
You can post a question to either poll students or perform a quick assessment. To post a question, click on the Create button in Classwork, the click on Question. Type your question (1) and select what type of question it is (2): multiple choice or short answer. If required, you can add additional content (3) in the forms of files, videos or links. There are toggles for whether you would like students to be able to reply to each other (4) to create more of a discussion. You can assign the question to a Topic and assign a points and a due date if desired (5). At the top, you can choose which classes you would like to post this question to (6). When you are finished creating your question you can click on the Ask button (7) to post the question immediately or click on the drop down arrow to schedule it for later or save a draft.

Materials
You may want to share resources with students that aren’t related to an assignment. The Materials item will allow you to share such items. To add a resource, click on the Create button in Classwork, then click on Material. Provide a Title (1) for your resource and a Description (2) if desired. Next, you will need to add your resource or resources by clicking on the appropriate icon(s) and following the instructions (3). You may add multiple resources to one Material. Assign the material to a Topic (4) for organization. Finally, click on Post (5) to share the Material immediately or click on the drop down arrow to schedule it for later or save a draft.

Additional Resources
- Additional video tutorial on creating assignments and using topics in Google Classroom…
- Google Support: Classroom Help
- Google Classroom Module of Granite’s Chromebook and Google Apps in the Classroom Training Site – Complete the training and pass the quiz to earn relicensure hours.
- Alice Keeler’s Google Classroom Resources


You must be logged in to post a comment.